Diamond Drive removal and inspection tortural

Modman

Active VIP Member
Joined
Mar 13, 2008
Messages
6,029
Reaction score
8,445
Location
Castlegar
Thanks for the info. I also read if you go to the 5203 you have to grind some shaft down a bit to make up for the larger bearing size. If the 3203 is the same size as the 5203 I am assuming you would have to machine the shaft down as well?

Also, in the diagram above which bearing is it?

Part 14 above. Cat made an updated thinner spacer (part 13) for this application that addressed the need to machine the shaft and eliminate any potential axial load that causes the issue. I've seen it for 3000 kms with my own eyes and its taken miles of BC mountain abuse with a tall lug track and no grease issue due to RPM speed on the bearing as claimed. I take mine apart once a season and the bearing is like new and even still have the new bearings in my parts bins because I thought I would need to change them by now, but they spin so clean its ridiculous. Had my dad inspect the tolerances to confirm and no issues (42 year retired machinist but you can argue with his findings if you want).
 

meierjn

Active VIP Member
Joined
Jan 29, 2007
Messages
1,168
Reaction score
679
Location
The Rose, Central Alberta
Part 14 above. Cat made an updated thinner spacer (part 13) for this application that addressed the need to machine the shaft and eliminate any potential axial load that causes the issue. I've seen it for 3000 kms with my own eyes and its taken miles of BC mountain abuse with a tall lug track and no grease issue due to RPM speed on the bearing as claimed. I take mine apart once a season and the bearing is like new and even still have the new bearings in my parts bins because I thought I would need to change them by now, but they spin so clean its ridiculous. Had my dad inspect the tolerances to confirm and no issues (42 year retired machinist but you can argue with his findings if you want).

Thanks for the info. I don't suppose you have a part number for the updated spacer? I am also wondering why you would need the spacer if people were having to machine the shaft due to the thicker 5203 and 3203 bearings?
 

Paul2727

Active member
Joined
Dec 28, 2011
Messages
30
Reaction score
36
Location
Reno, NV
In your drawing, the 6203 bearing is #14. If you install a 5203 or 3203 bearing, you must remove spacer #13, to have room for the wider bearing.

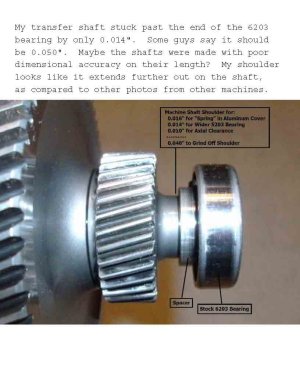
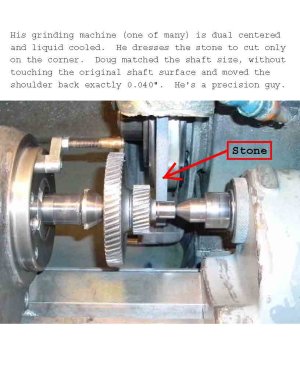
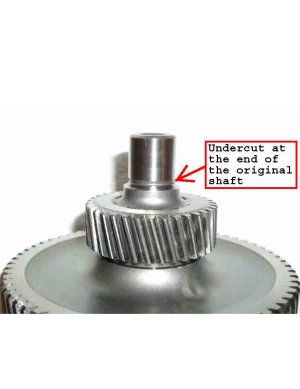
Arctic Cat manufacturing tolerances and quality control were poor in regard to this issue, so the same part in different machines may have different dimensions and must be corrected differently, including machines from the same model and year. Some machines require transfer shaft gear #12 to be trimmed (my 2011 HCR did not), and some require the track drive shaft (not shown on your drawing) to be machined (my HCR did). The best process I know of, for measuring and machining is included in the last post below, #118:

Post #11 in thread: https://www.snowandmud.com/arctic-cat-m-series-456/diamond-drive-issues-70013.html
Posts #28 #42 in thread: https://www.snowandmud.com/arctic-cat-m-series-456/2010-m8-sp-diamond-drive-bearing-53949.html
Posts #61, #71 and #118 in thread: https://www.snowandmud.com/arctic-c...-drive-bearing-upgrade-thread-lots-47974.html

Hope that answers your questions. Good Luck!
 
Last edited:

Modman

Active VIP Member
Joined
Mar 13, 2008
Messages
6,029
Reaction score
8,445
Location
Castlegar
You don't use the spacer if you use the wider bearing.

updated bearing spacer Part # 2602-259. Confirm the thickness when you get it, if needed you can machine the spacer down more instead of machining the shaft shoulder, but the new spacer should be 40 thou thinner than the original. Item #13 on this microfiche
2010 Arctic Cat M1000 SNO PRO (S2010M1LSEOSW) GEARCASE ASSEMBLY | Babbitts Arctic Cat Parts House

Its used on all the new DD's right up to the Bearcats and 570 that are still using the DD for 2013
 

meierjn

Active VIP Member
Joined
Jan 29, 2007
Messages
1,168
Reaction score
679
Location
The Rose, Central Alberta
So, I sourced a 3203 bearing and I got the cases opened up. The sled only has 400 mikes on it and the original bearing seems good. Its going to get changed anyway!

How do I remove the "gear transfer" assembly (#12 in the diagram) from the outside case? Do I have to remove the "shaft input" assembly (#10 in the diagram) first? The gear transfer assembly doesn't want to budge!

Thanks.

I managed to get the transfer assembly off. I just had to hold my tongue the right way.
 

Modman

Active VIP Member
Joined
Mar 13, 2008
Messages
6,029
Reaction score
8,445
Location
Castlegar
I managed to get the transfer assembly off. I just had to hold my tongue the right way.

Was gonna say - you just have to pull it. They get stuck in the case recess sometimes, just pull and wiggle it. Same deal going back in, just make sure you match up the case halves and get the pins lined up, then push it flat on all at the same time.
 

meierjn

Active VIP Member
Joined
Jan 29, 2007
Messages
1,168
Reaction score
679
Location
The Rose, Central Alberta
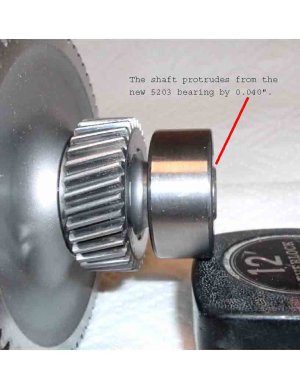
Well, I finally had another chance to work a bit on this little project. I removed the 6203 and spacer and then pressed on the 3203. As expected the cases didn't fit together very nicely. I am going to proceed with having the shaft ground as recommended. To correctly calculate the amount that should be ground off of the shaft:

Thickness of the 3203 minus the total thickness of the 6203 and the spacer. Is this correct?

Spacer=.154
6203=.471
Total=.625

3203=.688

.688-.625=.063

Does this sound correct?
 
Last edited:

Paul2727

Active member
Joined
Dec 28, 2011
Messages
30
Reaction score
36
Location
Reno, NV
Sounds a bit much, you could have more axial clearance than you actually need, but that won't hurt anything. So yes, that calculation is correct, to get the same fit as factory A/C.

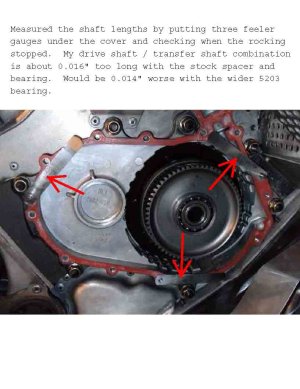
Another measurement method from my 2009 M8, which had a wider spacer:
Diamond Drive - 15.jpg Diamond Drive - 16.jpg Diamond Drive - 21.jpg Diamond Drive - 23.jpg Diamond Drive - 27.jpg
 

Attachments

  • Diamond Drive - 18.jpg
    Diamond Drive - 18.jpg
    38.6 KB · Views: 126
Last edited:

meierjn

Active VIP Member
Joined
Jan 29, 2007
Messages
1,168
Reaction score
679
Location
The Rose, Central Alberta
Thanks. My transfer shaft sticks out past the 6203 bearing .068". I think I'll get the machine shop to confirm all of my measurements before I ask them to grind off the .063" off of the shaft.
 
Top Bottom