Wall Jacking....What a P.I.T.A

lloydguy

Active VIP Member
Joined
Nov 29, 2010
Messages
889
Reaction score
1,499
Location
Lloydminster
I just thought I would post his so guy's can see what I'm talking about
as well as maybe answer afew questions I have for later in the project.
Garage was built between 73 and 74.Cement pad is cracked quite badly
and the ground is sloped slightly towards it on 3 of the 4 sides. The original
X 90 siding was just covered over with Vinyl.One of the major starters of the
current problem of a rotten sill plate is from the X 90(Basically MDF) being below
grade all the way around the garage.Water was wicking up the X 90 and seeping
into the garage under the sill plate.I have already dug out all of the soil 10" out from
the wall's and 10" down so I can install weeping tile all the way around and drain that into a sump in the back.(will be pumped from there down the side of the
driveway).Currently I am jacking up the outside wall's 8' at a time and installing
a new bottom plate.
AND...................... Finally one of my questions.
Who has used one of these and how well do they work?
Ramset | Mastershot 22 Calibre Trigger Tool | Home Depot Canada
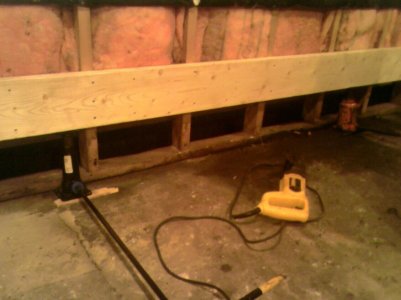
Old bottom plate after 8" of siding was cut off of the outside and 24" of drywall
cut off of the inside.(pretty much fell apart from cleaning with a broom)
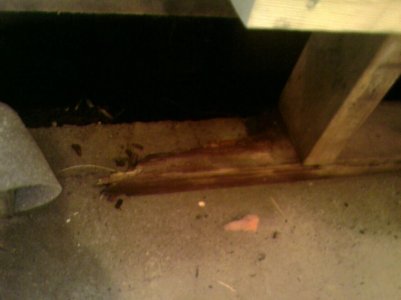
wall 1.jpg
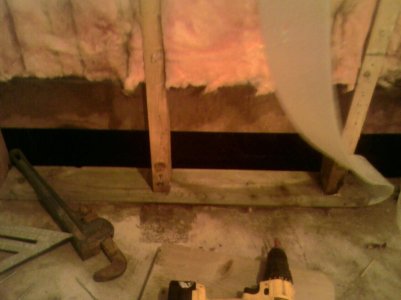
Simple but effective jacking system
wall 2.jpg

New bottom plate installed
wall 3.jpg
 

lloydguy

Active VIP Member
Joined
Nov 29, 2010
Messages
889
Reaction score
1,499
Location
Lloydminster
I have already bought 2 1/4" cement screws and drill bit's,but I would still have to borrow
a hammer drill from a buddy and from my past experiences installing screws into cement is
a HUGE PITA.and time consuming.
I would just like to know if these Hilti or Ram Set gun's are a better way to go.
Thank's to anyone that may have some advise.
 

neilsleder

Active VIP Member
Joined
Oct 18, 2009
Messages
9,618
Reaction score
17,005
Location
Leduc Alberta
I got to do the same thing to my garage. Not looking forward to it. The only time I seem those Hilti guns it worked not to bad but the cement broke away around the nail often.
 

Lund

Active VIP Member
Joined
May 4, 2013
Messages
4,247
Reaction score
11,288
Location
Vernon/Kelowna
How good is your concrete?
The Hilti will work well, even a heavy duty air framing nailer will do it with common nails. Especialy on old concrete.
 

Joholio

Active VIP Member
Joined
Nov 20, 2012
Messages
35,161
Reaction score
29,699
Location
Hespero/Sicamous
Looks like fun! lol They work fine. I have never used that particular model but have used the one you hit with a hammer to set the charge.
My shop walls are predrilled and secured with the Hilti bolts and washers and nuts. The hilti gun will definitely keep it still but won't really hold it down. Try a bead of PL before you set it down as well, it will create somewhat of a gasket too. The air nailer idea can work well too but you risk damaging the tool, as they are made to drive nails into wood, so I was told my framer buddy...
Have fun with that! Lol
 

X-it

Active VIP Member
Joined
Jan 8, 2007
Messages
7,748
Reaction score
17,699
Location
Prince George
A ramset does not work good and is dangerous ...spalled concrete will be your end result. Drill holes with a cheap hammer drill from p.a and there are various fasteners of all types that work good (screw nails you name it), tapcons and pl 400 premium are pretty good. Or if you want achors hilti makes some glue in ones that work. You might even have on in kijiji for 20 dollars.
 
Last edited:

Lund

Active VIP Member
Joined
May 4, 2013
Messages
4,247
Reaction score
11,288
Location
Vernon/Kelowna
Thats why i asked how old is his concrete, the hilti works well in new concrete but near edges and on old concrete it can break the concrete up. My self i would just put in a couple of concrete anchores with a hammerdrill and some PL and call it a day. Not hard to do. If you have access to a big nailer you could even drive a couple of nails for extra anchoring, i've used mine in concrete for plates many times no problem.
 
Last edited:

ferniesnow

I'm doo-ing it!
Joined
Dec 2, 2008
Messages
112,027
Reaction score
86,041
Location
beautiful, downtown Salmon Arm, BC
Rent a hammer drill and put in the expandable anchors (5/8"). Using duct tape, attach a small piece of hose on a shop vacuum to get the debris out of the hole and tap in the plug. Drill as far away from the edge as the bottom plate will let you allowing for the diameter of the washers. It will go easy and you don't have that many holes to drill.

Send Plio7 a PM, he will have all the real specs at hand! Good luck.
 

X-it

Active VIP Member
Joined
Jan 8, 2007
Messages
7,748
Reaction score
17,699
Location
Prince George
That particular Ramset fires a high speed nail, just like a hunting rifle where as shots from a hilti are slow speed, but the end holding power is so unpredictable you never know what the end result is going to be. If you do not want to drill holes, old fashion concrete nails can be driven in with a sludge hammer with ease. But 3/16 holes and those screws you bought hold good. I have never had much luck with expandable anchors, glued anchors are way better.
 
Last edited:

lloydguy

Active VIP Member
Joined
Nov 29, 2010
Messages
889
Reaction score
1,499
Location
Lloydminster
The old base plates aren't attached to the cement pad anywhere,I am not a contractor
that know's his stuff,I just thought it would be best to have it tied down at least every
4 '. One of my concerns with using a hammer drill was clearing the debris out of the hole,
as I have to change the bottom plate,true up the wall,then anchor it down through the
plate. I have bitten off a fair bit of work between the weeping tile and opening up the walls.
I don't want to add lot's more hours to the job with a hammer drill and screws if the Ram set
will do an equal job.
PS. The gun with the trigger I believe I posted the link to was like $250 at homedepot, so if
I am going to try this method I was going to buy the type that you hit the end with a hammer.
($35) at Rona.
 

plio7

GBCA Member
Joined
May 5, 2009
Messages
9,789
Reaction score
10,011
Location
Calmer, formerly of the GBCA
don't use a ramset. they work well for shooting to steel and even shooting some materials to concrete but for a solid hold of a 2x4 plate I would not recommend it, as said above to unpredictable. it may seem as though all nails have held when in reality one a few have....they also can work themselves out easily as they only penetrate about 1/4 inch. if your pad has been cracking then the slab is shifting. ram set/hilti shots are meant for static hold where there is little to no chance of the 2 attached materials shifting separately

use a hammer drill and 1/2" wedge anchors every 4' then its done and you don't have to worry about it and probably cheaper in the end. and far les frustrating
 

X-it

Active VIP Member
Joined
Jan 8, 2007
Messages
7,748
Reaction score
17,699
Location
Prince George
One more time ...do not use the one you hit with the hammer either, it is just a cheap ramset . Hammer drill it and you do not even have to clean the holes out, it takes 3 seconds to put a hole in. i have used common nails and just drove them in the holes. Common nails are those thicker softer nails. But your screws will thread right in there without cleaning it out also. That pl 400 premium glue will hold so tight the board will break above the glue joint.
 
Last edited:

ferniesnow

I'm doo-ing it!
Joined
Dec 2, 2008
Messages
112,027
Reaction score
86,041
Location
beautiful, downtown Salmon Arm, BC
don't use a ramset. they work well for shooting to steel and even shooting some materials to concrete but for a solid hold of a 2x4 plate I would not recommend it, as said above to unpredictable. it may seem as though all nails have held when in reality one a few have....they also can work themselves out easily as they only penetrate about 1/4 inch. if your pad has been cracking then the slab is shifting. ram set/hilti shots are meant for static hold where there is little to no chance of the 2 attached materials shifting separately

use a hammer drill and 1/2" wedge anchors every 4' then its done and you don't have to worry about it and probably cheaper in the end. and far les frustrating


As I said, Plio would come and give the be all and end all..............Hammer Drill it is and it won't be that expensive to rent!
 

plio7

GBCA Member
Joined
May 5, 2009
Messages
9,789
Reaction score
10,011
Location
Calmer, formerly of the GBCA
I would not use common nails to hold a bottom plate in place. They give good shear strength but not that great for tensile. Of that slab had already shifted and broke even with PL nails can pull out of concrete. If you do go that route and use PL be sure you clean the slab of all dust and debris very well. Yes pl wil hold and has an amazing bond but in my personal opinion I would trust any structural component of any building to an adhesive. Especially not at ground level that may see moisture.
 

teeroy

Active VIP Member
Joined
Oct 7, 2007
Messages
9,149
Reaction score
14,424
Location
Roma, Alberta
Yes pl wil hold and has an amazing bond but in my personal opinion I would trust any structural component of any building to an adhesive. Especially not at ground level that may see moisture.
well it seemed to work for polaris....oh, wait.....


I'm sorry, I had to....:D
 

lloydguy

Active VIP Member
Joined
Nov 29, 2010
Messages
889
Reaction score
1,499
Location
Lloydminster
As far as jacking it up and changing the bottom plate goes,wall #1 is done. 2'nd wall has all of the
drywall removed(24" from floor) and is ready to be lifted.when i'm done changing the bottom plate
all of the way around,i'm going to dig a hole under the cement pad and see if I can re-raise the one
back corner about 5/8'ths of an inch. About 3' x 6' of the pad has cracked badly and sunk about 5/8"
in the one back corner,I figure if I can dig a small hole in the corner (enough to get in a stubby 10ton
bottle jack and some planking) I should be able to lift the pad that much and with the end of a 1x4 I
should be able to tap on some extra material under that corner.
Ps. cement pad is only about 4" thick,so that little rectangular piece that has sunk slightly shouldn't
be too heavy to re-lift back to level.

As far as holding the wall's inplace once i'm done changing my bottom plates,I think I will listen to the
general word of advice and rent a hammer drill and install anchor's.
 

X-it

Active VIP Member
Joined
Jan 8, 2007
Messages
7,748
Reaction score
17,699
Location
Prince George
If this was my project i would lifting the building up 8 inches and pouring a curb...no anchors no nothing. Just pour those plates right into the a concrete curb. But let me tell you the building gets shaky so you have to be fast with all your ducks in a row or their will be problems no more than 8hrs tops. If your using anchors get the biggest hammer drill they have or you will be there forever putting in holes, and the glue in anchors are the best because everything moves around when drilling and they can still be repositioned them somewhat. You will also need large washers. Talk about turning a mole hill into a partial mountain maybe you should go down and buy that ramset after all.
 

OVERKILL 19

Active VIP Member
Joined
Dec 22, 2006
Messages
3,420
Reaction score
1,933
Location
Red Deer
I used these to hold my SM foam on the outside wall... They work great IMO not as fast as a hilti nail gun but at least you now what ya got when your done. You would need a bigger style but a smaller hole would be easier to drill just would need more of them. I rented the hand drill and bought two drill bits and changed them out every two holes to let them cool in a bucket of cold water. Heat kills those bits fast... Well any bit for that matter.
 

lloydguy

Active VIP Member
Joined
Nov 29, 2010
Messages
889
Reaction score
1,499
Location
Lloydminster
Well, my little weeping tile project has gotten way out of hand.In the beginning that's the only mod.
I was going to do to the old garage.As I think I stated before, after I dug the trench for the weeping
tile I thought I might as well take a peek under the bottom row of vinyl to see what the X-90 looked
like underneath. Once I discovered the X 90 was 2-3" below grade and rotten I decided to cut off 8"
and replace that with a 6" strip of 3/8" plywood.Then I found the sill plate was rotten,bottom 6" of
drywall was rotten,mold in the bottom foot of insulation,wall's are WAY off of level,only 3/4 of the back
wall has vapor barrier on it,peg board was nailed directly to the stud's(every time you put a peg in the
peg board you poke more holes in the vapor barrier.
The list is endless.....................Talk about opening a can of worms.
O, well. I'll just quit crying about it and keep plugging along.

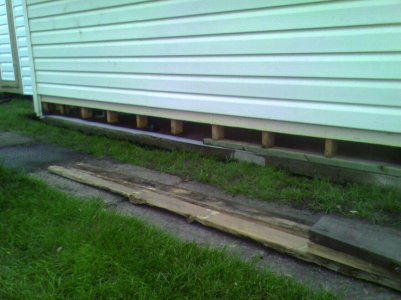
Outside wall w/trench dug for weeping tile,8" of x-90 cut off , gasket and new sill plate installed
outside wall.jpg

Since the whole back wall was peg board and it was installed WAY wrong,I just decided to strip the wall
bare and start over.Front and rear wall's are also leaning about 1.5" to the east,so removing the peg board
from the back and the drywall from the front should "weaken" the wall's enough to be able to pull them straight
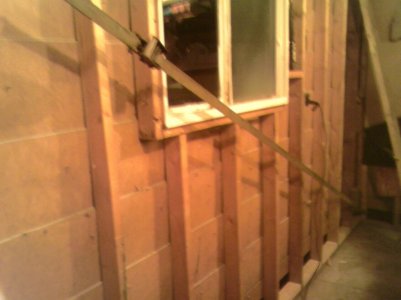
straightening wall.jpg
2" ratchet strap going from the bottom right corner to the top left.With a few hundred pounds
of force on the strap the wall is within 1/4" of being dead level.
 

ferniesnow

I'm doo-ing it!
Joined
Dec 2, 2008
Messages
112,027
Reaction score
86,041
Location
beautiful, downtown Salmon Arm, BC
Look at all the experience you are gaining! Keep up the good work and keep the pictures coming.

You may want to consider some extra studding along the window before you jack up that wall.....just a suggestion.
 
Top Bottom